Once the media scanning is done, you are able to start watching your videos through XBMC.
Choosing where to view your videos
If you are just watching the videos on a PC, then you can run XBMC and follow along below. If you are connecting the XBMC PC to a TV, you will need to make sure you have a video card with the proper outputs to connect to the TV. I chose to use an HDMI connection because it handles the video and audio all on one cable. I purchase a video card from Newegg that was $10 after a Mail in Rebate. Since this is just for playing back videos, you don’t need an expensive video card at all.
This is the card I got so you can compare to others you find: ZOTAC Synergy Edition ZT-60602-10L GeForce GT 610 1GB 64-bit DDR3 PCI Express 2.0 x16
Watching some videos
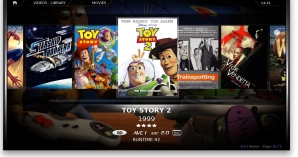
If you are using the default skin/theme, and have setup a source for Movies and TV Shows in the previous step , you should now have items across the menu for both of them, as well as Videos, Music, Photos, etc. If you don’t see an item for TV Shows or Movies, you may find them under the Videos section. You can change this behavior in one of the settings areas within XBMC.
Navigate to Movies and open it up. You should now see a list of your movies. You can pop out the menu bar, from the left side, to change the display. You can view icons, lists, icons with media info, etc. When you have a movie selected, you can press ‘i’ on the keyboard to bring up the info about the movie. Or you can just click it to begin playing.
Controls
If you are connecting your XBMC PC to a TV, you probably don’t want to be using a keyboard and mouse to control everything. Good News. You can control your XBMC via some remote as well. I have an old Streamzap remote that works fine for me. Lots of people use Logitech Harmony remotes as well. Some people prefer to just use a mouse so it’s up to you. You can also use an Android device as a remote control as well. Last I checked this only worked well with version 11 of XBMC. If using version 12, the official remote program doesn’t work quite right.
The next thing you need to do is play around with the interface and see what you can find on your own.
Once you’re comfortable with the XBMC interface, you might want to look into some Add-ons to make it even better.
